Before start, you can guide yourself with the video that it's on YouTube (Spanish) and with the example code on Github. The video it's exactly the same guide that you'll see on this guide, but more graphically.
1. Create the HTML tags on the document
-
You need to create a table tag with an id. The id can be anything. Just remember this id because will be need on the next steps.
-
You need to create an html tag, div for example, with an id. The id can be anything. Just remember this id because will be need on the next steps.
-
Add the css style sheet. (You can use the .scss file to if you preffer it).
<link rel="stylesheet" href="../node_modules/js-smart-table/dist/styles/main.css">
Example
<!DOCTYPE html>
<html lang="en">
  <head>
    <meta charset="UTF-8" />
    <meta http-equiv="X-UA-Compatible" content="IE=edge" />
    <meta name="viewport" content="width=device-width, initial-scale=1.0" />
    <title>js-smart-table</title>
    <link rel="stylesheet" href="../node_modules/js-smart-table/dist/styles/main.css">
  </head>
  <body>
    <table id="users"></table>
    <div id="pagination-users"></div>
  </body>
  <script src="bundle.js"></script>
</html>
2. Create the type configuration
Note.
You can check the repository as an example to follow this 'How to use'.
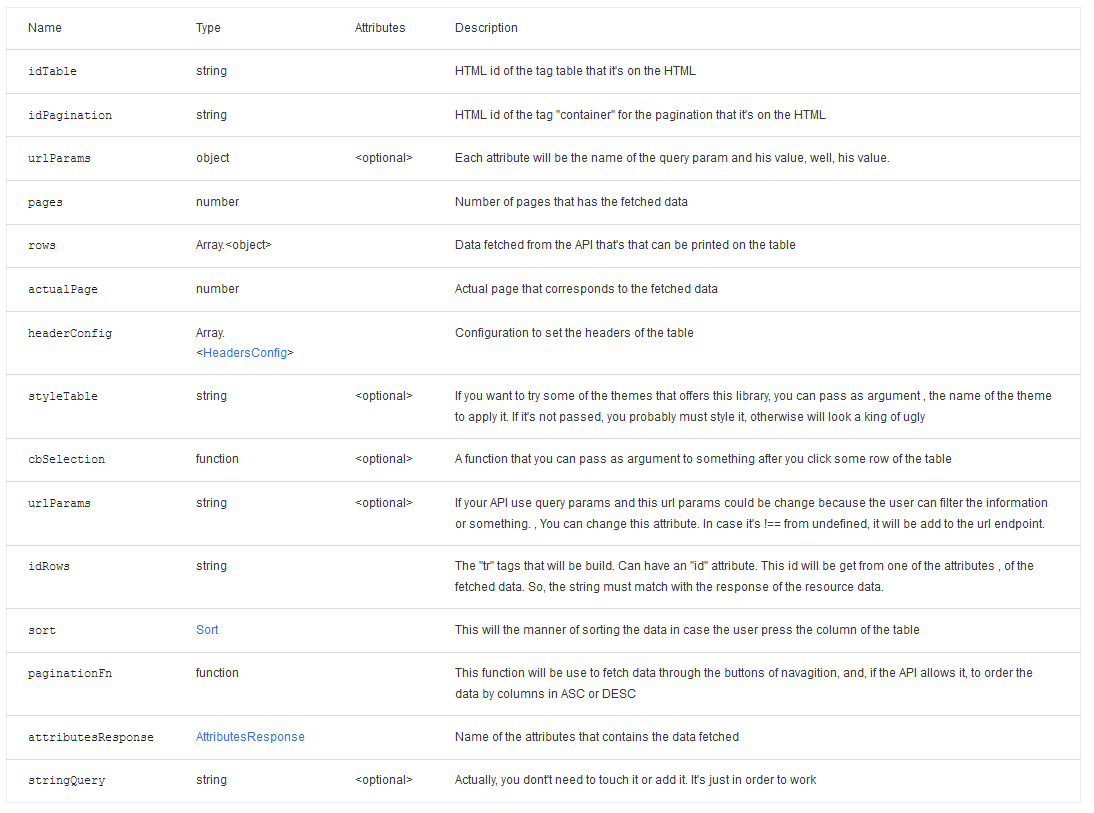
This means create an object that must follow an skeleton in order to work. The structure that must follow it's of type APIConfig.
This configuration, contains more type configurations, you can check that types meanwhile we advance on the tutorial. This was just to notice you that the json we gonna create must follow to structure or won't work.
- idTable:string - HTML id of the tag table that it's on the HTML.
Example (As we progress through the guide, the other properties will be reflected in the sample codes.)
const configurationUsers = {
    idTable:'users'
};
- idPagination:string: - HTML id of the tag div created that will work as the pagination.
Example
const configurationUsers = {
    idTable:'users',
    idPagination:'pagination-users'
};
- urlParams?:object: - URL Params that will have the initial table when fetchs the data. This urls params can be set manually on the code or can be get from a select (just to put an example).
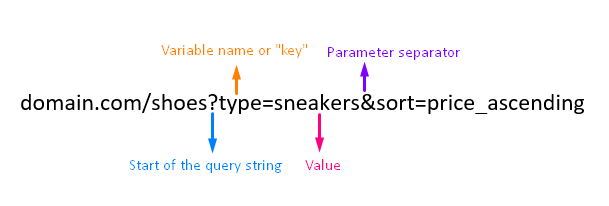
More information about the url params here
Example
export const configurationUsers = {
    idTable:'users',
    idPagination:'pagination-users',
    urlParams:{
        hora:'0',
        materia:'401'
    }
};
That property, by behind, will be converted into this: &hora=0&materia=401.
This data can be access by the property of the instance calling [your_instance_name].[your_name_configuration_table_variable].stringQuery
- pages:number:Indicates the number of pages founded for the requested data.
Because we are creating the configuration, we can set this with 0 for now.
Example
export const configurationUsers = {
    idTable:'users',
    idPagination:'pagination-users',
    urlParams:{
        hora:'0',
        materia:'401'
    },
    pages:0
- rows:Array|object|: JSON with the data founded. Array of objects.
Because we're creating the configuration, we can set this as empty. Then we can fill it.
Example
export const configurationUsers = {
    idTable:'users',
    idPagination:'pagination-users',
    urlParams:{
        hora:'0',
        materia:'401'
    },
    pages:0,
    rows:[]
};
- actualPage:number: Indicates which page we are now on the navigation of the table.
Because we're creating the configuration, we can set this as 0.
Example
export const configurationUsers = {
    idTable:'users',
    idPagination:'pagination-users',
    urlParams:{
        hora:'0',
        materia:'401'
    },
    pages:0,
    rows:[],
    actualPage:0
};
- headerConfig:Array|object|: This is a 'type definition'. Let's se how must be this property. You can see this as the "configuration of columns"
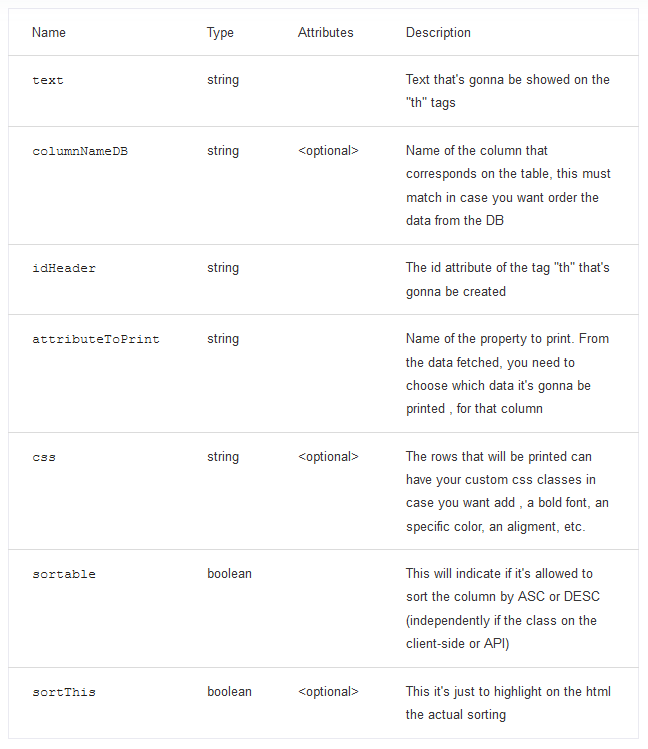
7.1 text:string: The text that it's gonna appear on the column of the table.
Example
const headerConfig = [
    {
        text:'Materia'
    }
];
7.2 columnNameDB:string: It's the value of the argument that needs the API in order to know which column must order when the data it's requested. This value it deppends of the API that you're using. If the API can accept arguments in order to sort, you can put this value, if not, it doesn't mind.
Example
const headerConfig = [
    {
        text:'Materia',
        columnNameDB:'nombreMateria'
    }
];
7.3 idHeader:string: Value of the id that is gonna have this th tag in order to manipulate with the DOM in the case that we want do it.
Example
const headerConfig = [
    {
        text:'Materia',
        columnNameDB:'nombreMateria',
        idHeader:'nameAssignature'
    }
];
7.4 attributeToPrint:string: The attribute of the objects that must be printed on the UI.
Example Suppose you have this structure on the JSON data.
{
    "idAssignature": 829,
    "clave": 831,
    "plan": 401,
    "grupo": 1,
    "dia": 2,
    "hora": 0,
    "salon": "1102",
    "actualCapacity": 0,
    "maxCapacity": 20,
    "nombreMateria": "ADMON DE PROYECTOS DE SOFTWARE"
}
By know, i will put nombreMateria because im creating a column for the name assignatures, so, it's logic to print that text con the rows.
const headerConfig = [
    {
        text:'Materia',
        columnNameDB:'nombreMateria',
        idHeader:'nameAssignature',
        attributeToPrint:'nombreMateria'
    }
];
7.5 sortable:boolean: If true, when the user clicks on the column of the UI, the code will know that must sort the data by the column the user clicked. If false, the code just wont do anything.
Example
const headerConfig = [
    {
        text:'Materia',
        columnNameDB:'nombreMateria',
        idHeader:'nameAssignature',
        attributeToPrint:'nombreMateria',
        sortable:true
    }
];
7.6 css:string - CSS style that gonna have the rows at the moment of impression. (This style must exist in your css sheet in order to work)
Example
const headerConfig = [
    {
        text:'Materia',
        columnNameDB:'nombreMateria',
        idHeader:'nameAssignature',
        attributeToPrint:'nombreMateria',
        sortable:true,
        css:'font-weight-bold'
    }
];
7.7 sortThis?:boolean - If true, by default the code will set everything in order to set that the data must be fetched by this column. This property just must be use on one object of the array.
Example
const headerConfig = [
    {
        text:'Materia',
        columnNameDB:'nombreMateria',
        idHeader:'nameAssignature',
        attributeToPrint:'nombreMateria',
        sortable:true,
        sortThis:true
    },

    { text:
        'Salon',
        columnNameDB: 'salon',
        idHeader: 'assignatureRoom',
        attributeToPrint: 'salon',
        sortable: true
    }
];
- styleTable?:string - "Appearance/Theme" that will have the table when it renders on the browsers. Must be one of the available strings on the list.
- default
Example
export const configurationUsers = {
    idTable:'users',
    idPagination:'pagination-users',
    urlParams:{
        hora:'0',
        materia:'401'
    },
    pages:0,
    rows:[],
    actualPage:0,
    headerConfig,
    styleTable:'default'
};
If you preffer, you can avoid this and set your own styles.
- cbSelection:function - Function that will be executed when you click a row from the table. The function must receive an argument to listen the event of the click.
Example
function cbSelection(e){
    alert('Seleccionaste una fila de la tabla');
    console.log(e);
}
- idRows:string - Attribute of the response to be use as id for the
trtags.
Example
Imagine you have this as response
{
    "idAssignature": 829,
    "clave": 831,
    "plan": 401,
    "grupo": 1,
    "dia": 2,
    "hora": 0,
    "salon": "1102",
    "actualCapacity": 0,
    "maxCapacity": 20,
    "nombreMateria": "ADMON DE PROYECTOS DE SOFTWARE"
}
If you put idAssignature the rows will have that information as id on the tag.
export const configurationUsers = {
    idTable:'users',
    idPagination:'pagination-users',
    urlParams:{
        hora:'0',
        materia:'401'
    },
    pages:0,
    rows:[],
    actualPage:0,
    headerConfig,
    styleTable:'default',
    cbSelection,
    idRows:'idAssignature'
};
- sort:object - Type definition. This indicates how must be the sorting.
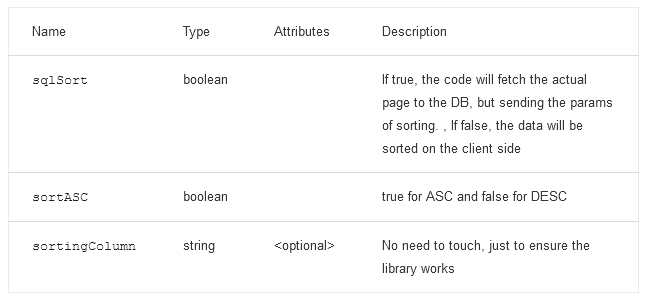
11.1 sqlSort:boolean - If true, the sort will be by the API, if false, the data will be sorted on the client side (just the visible ones on the moment of fetch)
Example
const sort = {
    sqlSort:true
}
11.2 sortASC:boolean - If true, data it's gonna be sort ASC, if not, then DESC.
Example
const sort = {
    sqlSort:true,
    sortASC:true
}
- paginationFn:function - Function that's gonna be used to fetch the information when navigate thorught the pages or request a new way or sorting the data. This codes will executes
- When we navigate througth the pagination (buttons or inputs)
- Sort in a differente way the data (clicking the columns of the table)
This function must follow a structure in order to work.
Function
/**
 * How must looks like the functions that fetchs data from the API
 *
 * @async
 * @function paginationFn
 * @param {number} page - The page requested of the information
 * @param {string} order - ASC or DESC the data
 * @param {string} columnOrdering - Which column it's gonna be counted for the sorting (must match with the column table of the table on DB)
 * @param {string|undefined} additionalQuery - In case you want set more url params, you need to pass the array
 * @returns {object}
 */
export async function paginationFn(page,order,columnOrdering,additionalQuery="&hora=0&plan=401"){

    let assignatures = await fetch(`http://localhost:4000/api/paso1/materias?pagina=${page}&orden=${order}&columna=${columnOrdering}${additionalQuery}`);

    assignatures = await assignatures.json();

    return assignatures.data;
}
Its important that the object that returns the function, must have at least, this 3 propertys
- actual page that corresponds the requested data
- number of pages founded
- the data
property xproperty zetc...
This it's the 'structure' that the fetchFn must return. (Just an example). As you can see, it's an object that the paginationFn must return.
{
    "assignatures": [
    {
        "idAssignature": 829,
        "clave": 831,
        "plan": 401,
        "grupo": 1,
        "dia": 2,
        "hora": 0,
        "salon": "1102",
        "actualCapacity": 0,
        "maxCapacity": 20,
        "nombreMateria": "ADMON DE PROYECTOS DE SOFTWARE"
    },

        {...},
        {...}

    ],

    "pages": 3,

    "actualPage": 1
}
Example
export const configurationUsers = {
    idTable:'users',
    idPagination:'pagination-users',
    urlParams:{
        hora:'0',
        materia:'401'
    },
    pages:0,
    rows:[],
    actualPage:0,
    headerConfig,
    styleTable:'default',
    cbSelection,
    idRows:'idAssignature',
    sort,
    paginationFn
};
- attributesResponse:object - A type definition.
Taking as example the next data that returns the
paginationFnafter fetching the API
{
    "assignatures": [
    {
        "idAssignature": 829,
        "clave": 831,
        "plan": 401,
        "grupo": 1,
        "dia": 2,
        "hora": 0,
        "salon": "1102",
        "actualCapacity": 0,
        "maxCapacity": 20,
        "nombreMateria": "ADMON DE PROYECTOS DE SOFTWARE"
    },

        {...},
        {...}

    ],

    "pages": 3,

    "actualPage": 1
}
13.1 pages:string - Here it's goes the name of the attribute that contains the number of pages. On this case.
Example
const attributesResponse = {
    pages:'pages'
};
13.2 actualPage:string - Here it's goes the name of the attribute that contains the actual page that correspond to the fetched data. On this case.
Example
const attributesResponse = {
    pages:'pages',
    actualPage:'actualPage'
};
13.3 data:string - Here it's goes the name of the attribute that contains the JSON with the data. On this case.
Example
const attributesResponse = {
    pages:'pages',
    actualPage:'actualPage',
    data:'assignatures'
};
Nice! At this point it's already created the object that need the constructor at the moment of instance. So let's go with that.
3. Import the library
Importing the library
When you import the library, you need to do it like this.
import { DefaultTable } from 'js-smart-table/dist/pagination';
Here, you can do an object destructuring. For now, it's only available the DefaultTable class. Each class you can see it as the code of different theme styles to display the table.
List of classes you can import
- DefaultTable
A little reminder, that you can see all this on the repository
Importing the configuration variable
import { configurationUsers } from './configuration-table';
Initializing the table
Before initialize the code to display the table, it's necessary overwrite the configuration variable. Because all was setted as 'empty'. So, in order that something it's display when the table renders, the configuration file need the data, especificaly of the propertys
- pages
- rows
- actualPage
How to achieve this? Calling the data from the API for the first page and overwrite with the response information.
Example
import { DefaultTable } from 'js-smart-table/dist/pagination';
import { configurationUsers } from './configuration-table';
import { paginationFn } from './api';

async function initialLoad(){
    const dataFetched = await paginationFn(1,'DESC','nombreMateria','&hora=0&plan=401');

    configurationUsers.pages = dataFetched.pages;
    configurationUsers.actualPage = dataFetched.actualPage;
    configurationUsers.rows = dataFetched.assignatures;
}

initialLoad();
Final step, print it!
Now that the configuration variable has the data, when the methods of the class printTable() and printPagination are used, they will display the data tabulated.
printTableit's use to display the data tabulated according to the configuration set.printPaginationit's use to display the pagination according to the class used to instance.
So, now just remains use the the methods.
Example
import { DefaultTable } from 'js-smart-table/dist/pagination';
import { configurationUsers } from './configuration-table';
import { paginationFn } from './api';

let Assignatures;

async function initialLoad(){
    const dataFetched = await paginationFn(1,'DESC','nombreMateria','&hora=0&plan=401');

    configurationUsers.pages = dataFetched.pages;
    configurationUsers.actualPage = dataFetched.actualPage;
    configurationUsers.rows = dataFetched.assignatures;

    Assignatures = new DefaultTable(configurationUsers);
    Assignatures.printTable();
    Assignatures.printPagination();
}

initialLoad();
Again, a little reminder that the code of this guide it's here